This guide is written for assembly technicians, product engineers, and maintenance teams working with commercial appliances, industrial equipment, or vehicle hoods. It covers the complete installation sequence from surface preparation through functional validation, reflecting the practices used in professional OEM assembly contexts.
Common consequences of improper installation include:
- Hood sag or uneven panel gaps when closed
- Binding or grinding through the travel arc
- Fastener pull-out under dynamic load
- Hood failing to hold open position — a genuine safety risk
Key Takeaways
- Confirm hinge compatibility (mounting pattern, load rating, range of motion) before unpacking
- Prepare mounting surfaces first — warped, corroded, or dirty surfaces disqualify the installation before it starts
- Follow the sequence: prepare → position → torque in order → adjust spring tension → validate
- Torque fasteners using the manufacturer's specification and a cross-pattern sequence; never tighten by feel
- Validate under actual load before service; a hinge that looks correct at rest can still fail
Installation Guide for Hood Hinge Assembly
The installation process moves through four phases: preparation, positioning and securing, mechanical integration and adjustment, and validation. Each phase depends on the previous one being done correctly. Skipping or reversing steps — particularly around fastener sequencing and tension adjustment — creates misalignment that only becomes apparent under load, often after the equipment is in service.
Time and staffing expectations:
- A single hood hinge installation typically takes 30–90 minutes, depending on equipment type and hinge complexity
- Two-person teams are recommended for heavier hood assemblies — controlling hood weight during mounting is not a one-person job
Prerequisites and Safety Considerations
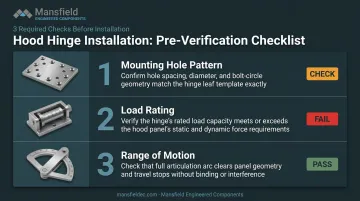
Before touching the hinge assembly, confirm three things against the manufacturer's spec sheet:
- Mounting hole pattern — verify the hinge matches the exact hole layout on both the hood and frame/body side; even a few millimeters of offset prevents flush seating
- Load rating — the rated capacity must exceed actual hood weight; a hinge operating at its ceiling fatigues faster under real-world vibration
- Range of motion — the hinge must support the designed open angle without binding at any point in travel
Surface readiness is non-negotiable. The mounting surface must be clean, flat, and structurally sound. Any corroded, warped, or damaged mounting points must be repaired or reinforced before installation begins — not after.
Off-specification components force field compromises that affect both safety and service life. Custom-engineered assemblies designed for specific load and travel requirements eliminate this guesswork from the start.
Stop conditions — do not proceed if:
- The mounting surface is warped or corroded
- The hinge's rated load capacity is lower than the actual hood weight
- Required fastener size doesn't match the hardware specified for the application
Safety throughout installation: The hood must be fully supported by a prop rod, mechanical support arm, or second technician at all times. Never rely on a partially mounted hinge to bear hood weight.
Tools and Parts Required
Tools:
- Calibrated torque wrench and appropriate socket set
- Screwdrivers (flathead and Phillips as applicable)
- Alignment pins or drill template (if supplied with the hinge)
- Spring tension adjustment tool (for spring-loaded or counterbalanced assemblies)
- Clean, lint-free cloth for surface preparation
Parts and documentation:
- OEM-specified fasteners — bolts, washers, lock washers, or thread-locking compound as specified
- Any shims or spacers noted in the product documentation
- The hinge assembly's installation drawing or spec sheet
Non-specified fasteners and missing thread-locking compound are two of the most consistent causes of hinge loosening in service. Henkel's threadlocking guide explains why: thread tolerances create gaps that allow side-to-side movement under vibration. Liquid threadlockers fill those voids to prevent loosening under dynamic load. Apply them only where the OEM joint design calls for them.
How to Install a Hood Hinge Assembly (Step-by-Step)
These steps follow a logical order. Reversing or skipping steps (especially around fastener sequencing and tension adjustment) produces misalignment that often only shows up under load.
Step 1 — Prepare the Mounting Surface and Position the Hood
Clean both mounting surfaces (hood-side and body/frame-side) with a lint-free cloth. Remove any burrs, debris, or residue from mounting holes. Position the hood at its designed open angle using a mechanical support or prop rod.
Before touching the hinge: confirm the hood sits square and level. If it doesn't sit true at rest, no amount of hinge adjustment will correct the underlying geometry problem.
Step 2 — Position and Loosely Attach the Hinge Assembly
Align the hinge to the mounting hole pattern on both the hood side and the frame/body side. Use alignment pins if supplied ; they exist precisely to prevent the hinge from cocking during initial placement.
Critical: start all fasteners by hand to their threads before tightening any of them. Tightening one fastener before the others are started causes the hinge plate to cock slightly, which creates binding once the assembly is under load.
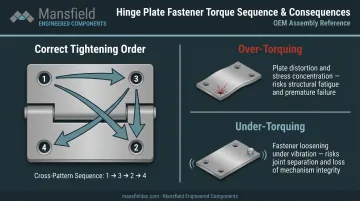
Step 3 — Torque Fasteners to Specification in the Correct Sequence
Follow the manufacturer's torque specification exactly, not an approximation. Use a calibrated torque wrench; NASA-STD-5020A notes that torque control is the least accurate method for achieving target preload. That makes tool calibration and using published OEM values (not estimates) the only reliable approach.
Tighten fasteners in a cross-pattern sequence (similar to wheel-lug torquing) so the hinge plate seats evenly across all contact points. The consequences of getting this wrong:
- Over-torquing distorts the hinge plate and can cause stress concentrations at the mounting holes
- Under-torquing leads to fastener loosening under the dynamic loads of repeated cycling
Apply thread-locking compound to any fastener where the OEM documentation specifies it, particularly on joints subject to vibration.
Step 4 — Adjust Spring Tension or Counterbalance Setting
For spring-loaded or counterbalanced hood hinge assemblies, set the tension according to the manufacturer's specification for the hood's actual weight. This step applies specifically to assemblies with integrated counterbalance or torsion spring mechanisms.
Do not skip this step even if the hood holds position initially. Spring behavior shifts with temperature and load cycling.
Southco's counterbalance hinge documentation flags that spring-tension components can cause serious injury if disassembled improperly. Work within the OEM's specified adjustment range and do not attempt to modify the spring mechanism itself.
Step 5 — Cycle the Hood Through Its Full Range of Motion
Open and close the hood slowly several times. Check for:
- Binding or uneven resistance at any point in the travel arc
- Misalignment between the hood panel and equipment body at the closed position
- Any creeping from the open position (for counterbalanced assemblies)
If slotted mounting holes are provided, use them to make minor positional adjustments before final torque lock-down. Once you're satisfied with smooth, consistent travel, apply final torque to all fasteners.
Post-Installation Checks and Validation
A hinge that appears correctly installed at rest may bind, sag, or fail to hold under actual operating conditions. That gap between "looks installed" and "functions correctly" is exactly why OSHA 29 CFR 1926.1412 requires that equipment with modifications, repairs, or adjustments be inspected by a qualified person and functionally tested before use — skipping this step is how field failures make it past the assembly line.
Visual and Structural Checks
Confirm all of the following before functional testing:
- Both hinge plates are fully flush against their mounting surfaces — no gaps or rocking
- No fastener heads are proud or cocked
- The hinge pin is fully seated with no lateral play
- No deformation of the hinge body or mounting surface occurred during installation
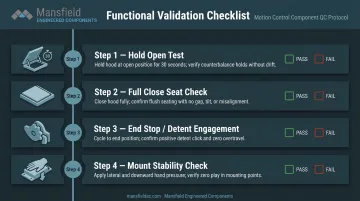
Functional Tests
- Open the hood to its designed maximum angle and hold for 30 seconds: counterbalanced assemblies should show zero downward creep
- Close the hood and confirm it seats fully and evenly across its full width
- Check that any integrated end stops or detent positions engage as designed
- Apply light hand pressure to the hinge mount — any movement or flex indicates undertorqued fasteners
Warning Signs of Incorrect Installation
| Symptom | Likely Cause |
|---|---|
| Hood creeps down from open position | Undertensioned counterbalance; spring not set to actual hood weight |
| Uneven panel gaps when closed | Hinge misalignment during fastener seating |
| Resistance or grinding during travel | Angular misalignment or debris in pivot area |
| Movement/flex in hinge mount under hand pressure | Undertorqued fasteners |
Common Installation Problems and Fixes
Hood Creeps Closed from the Open Position
Problem: The hood slowly falls from the open position rather than holding in place.
Likely cause: Insufficient counterbalance spring tension — either the tension was not set during installation, or it was set without accounting for the actual hood weight.
Fix: Re-access the spring tension adjustment mechanism and increase tension incrementally. Cycle the hood after each adjustment until it holds at the specified open angle under its own weight. Increase tension gradually, one adjustment cycle at a time.
Hinge Binds or Moves Unevenly Through Its Range of Motion
Problem: The hood resists movement, grinds, or moves with uneven effort through its travel arc.
Likely cause: Angular misalignment between the hood-side and frame-side mounting plates, typically caused by fasteners being tightened before both plates were fully seated.
Timken's bearing damage analysis data shows that 90% of premature pivot failures stem from non-fatigue factors, with misalignment and improper handling chief among them — a pattern that holds equally for hinge pivots.
Fix: Back off fasteners partially, re-seat both hinge plates simultaneously to the mounting surfaces, and re-torque in the correct sequence. Inspect the pivot area for burrs or debris.
Hood Panel Misaligns When Closed (Uneven Gaps)
Problem: The hood doesn't sit flush or evenly against the equipment body when fully closed.
Likely cause: One or both hinge mounting positions are off the intended hole pattern, or the hood wasn't held square during initial fastener seating.
Fix: Use slotted mounting holes (if present) to micro-adjust hinge position. If no slots exist, fully remove and reposition the hinge using an alignment template or direct measurement from the design drawing before re-torquing. Panel gap and flushness are measurable: use feeler gauges, not visual judgment alone.
Pro Tips for Installing a Hood Hinge Assembly Effectively
Install dual hinges simultaneously. On a dual-hinge hood, loosely attach both hinges before tightening either. The hood's natural resting position should govern hinge placement. If you fully torque the first hinge before starting the second, you're forcing the second hinge to conform to the first — which introduces misalignment that may not show up until the panel is under load.
Mind the installation temperature. Avoid calibrating spring tension on counterbalance assemblies in cold environments. Spring behavior at installation temperature should match expected in-service conditions. A tension setting that holds correctly at 40°F may be inadequate at normal operating temperature.
Document everything. Record final torque values, spring tension settings, and any positional adjustments made during installation. This data supports quality records, warranty claims, and consistent replication across production units.
Know when to stop. If the assembly requires field modification to fit the mounting pattern, or if the hood weight falls outside the hinge's rated range, stop and contact the manufacturer's engineering team. Field modifications to structural hinge components compromise load ratings and safety margins — the original design intent cannot be recovered through improvised fixes. For volume OEM applications, Mansfield Engineered Components provides application-specific installation drawings and torque specifications as part of the custom hinge design process, reducing the likelihood of fit issues before production begins.
Conclusion
The quality of a hood hinge installation determines the equipment's operational safety, panel alignment, and long-term hinge service life. Cutting corners here creates problems that show up later — under load, in the field, and at the worst possible time.
Preparation sets the foundation: specification verification, surface readiness, and the right tools make every subsequent step more predictable. From there, correct sequencing, calibrated torque, and proper tension setting determine whether the installation holds up over its full service life. Thorough validation before the equipment enters service catches the failures that only appear under load or in motion — not on the bench.
When specifications are unclear, or the application falls outside standard parameters, contact the hinge manufacturer's engineering team before proceeding.
Frequently Asked Questions
What is a hood hinge assembly and what does it do?
A hood hinge assembly is a mechanical component that controls the pivoting motion of a hood or access panel, supporting its weight and guiding its travel arc. Most assemblies incorporate counterbalance or torsion spring mechanisms that offset the panel's weight, allowing the hood to hold open safely without a prop rod.
How do I know what size or type of hood hinge assembly I need before installing?
Selection depends on hood weight, required range of motion, mounting hole pattern, and environmental conditions. The hinge's rated load capacity must meet or exceed actual hood weight with an appropriate safety margin — parameters that are confirmed during the engineering design phase for custom OEM applications.
Can a hood hinge assembly be installed by one person?
Lighter panels can typically be installed by one person. Heavier hood assemblies require a second person or mechanical support arm to hold the hood safely in position during mounting — relying on a partially attached hinge to bear hood weight is a safety hazard.
What causes a hood hinge to wear out or fail prematurely after installation?
The most common causes are improper torque, misalignment at installation, and using a hinge not rated for the actual hood weight. Assembly and handling errors can defeat expected service life well before mechanical fatigue becomes a factor.
Do I need thread-locking compound when installing a hood hinge assembly?
Apply thread-locking compound only where the manufacturer specifies it — typically on fasteners subject to vibration or repeated cycling. Adding it as a general precaution on unspecified fasteners can cause issues during future disassembly.
What is the difference between a standard hood hinge and a counterbalance hinge assembly?
A standard hinge provides pivot motion only. A counterbalance hinge integrates springs, torsion mechanisms, or gas-assist components that offset hood weight — allowing the panel to hold open at a set angle without external support. Counterbalance assemblies require tension calibration during installation; standard pivot hinges do not.