Get this wrong, and the consequences show up fast: uneven sash gaps, a window that won't stay open, accelerated hinge wear, and compromised weathersealing. The Securistyle Defender range, for instance, achieves its weatherproofing performance — tested to BS 6375-1 — specifically because the hinge geometry and fit work together. When either is off, so is the seal.
The good news: a competent technician can fit a matched pair of friction hinges on a standard casement window in under an hour. The most time-sensitive part isn't the drilling — it's the specification check that happens before it.
Key Takeaways
- Confirm hinge orientation (side hung vs. top hung) and load rating before touching the window
- Match track width, overall track length, and stack height — 13mm for a flat arm, 17mm for a kinked arm
- Fit the frame track first, then attach the sash arm, always following the directional arrow before opening the arm
- After fitting, check that the sash closes flush, gaps are even, and the window holds position without drifting
- Never force the hinge arm in the wrong direction — this permanently stresses the internal friction mechanism
Friction Hinge Fitting Guide for Windows
This process moves through four defined phases: compatibility checking, fitting the frame track, attaching the sash arm, and post-fit validation. Shortcuts at any stage tend to create functional problems that are harder to fix after the window is installed.
Prerequisites and Compatibility Checks
Step one before anything else: confirm the window opening orientation.
- Side hung windows (open left or right) require hinges fitted to the top and bottom edges of the sash
- Top hung windows (open outward from the top) require hinges fitted to the left and right sides
- These two types are not interchangeable — check the hinge manufacturer's product specification for application limits
Next, verify three hinge dimensions against the existing window profile:
| Dimension | What to Measure | Typical Values |
|---|---|---|
| Track width | Outermost edge of the track | Varies by profile — confirm against manufacturer data |
| Overall track length | Full length of the frame-side track including end cap | Sold in inch increments (10", 12", 16") |
| Stack height | Closed thickness of the hinge arm | 13mm (flat arm) or 17mm (kinked arm) |
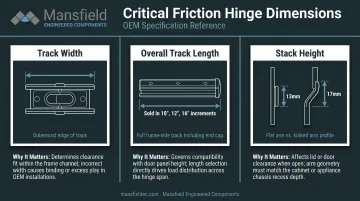
Stack height in particular must match your existing profile. ERA's replacement hinge fitting instructions confirm this explicitly: replacement hinges should be similar in overall size and stack height to the existing hinge, fitting 13mm profiles without packers and 17mm profiles with packers.
Also note that some hinges are application-specific by length. ERA specifies that 10-inch hinges are for top-hung windows only, while 12-inch and 16-inch versions apply to both top-hung and side-hung configurations.
Once dimensional compatibility is confirmed, verify the frame material — it determines drill bit selection, screw type, and torque limits before you pick up a tool.
Confirm the frame material before drilling:
- uPVC — threads strip easily; use correctly sized screws and do not over-torque
- Aluminum — some frames use rivets rather than screws; replace like-for-like
- Timber — pilot hole depth may need adjustment depending on timber density
For window manufacturers specifying friction hinges at volume, the same discipline applies at scale: load rating, dimensional requirements, and material specification all need to be locked in before production begins. Mansfield Engineered Components takes this approach on custom hinge programs, validating force profiles, cycle life, and hold-at-angle performance in prototyping before any production run starts — which eliminates the retrofitting problems that surface when standard catalog parts are applied to application-specific profiles.
Tools and Materials Required
Tools:
- Electric drill with bits sized for the frame material
- Manual or powered screwdriver
- Tape measure and pencil
- Bubble level
- Small square (optional — useful for confirming 90° alignment)
Materials:
- One matched pair of friction hinges — check whether your hinge is handed (marked L or R) or symmetrical; this varies by manufacturer. Mila's fitting instructions require left/right selection, while Nico's standard 13mm hinge is symmetrical. Follow the specific hinge manufacturer's guidance
- Screws of the correct length and thread type for the frame material
- Washers if specified by the manufacturer
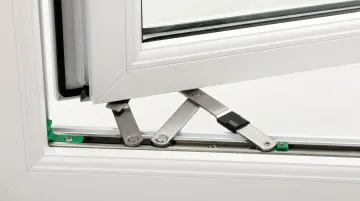
Before opening the hinge arms: locate the directional arrow stamped or marked on the hinge. This indicates the direction the hinge is designed to open. The arm must only be opened in this direction; forcing it the opposite way risks damaging the friction mechanism permanently.
How to Fit a Friction Hinge: Step-by-Step
Friction hinge fitting follows a fixed sequence — frame track first, sash arm second, engagement third. Reversing this order or skipping alignment checks is the most common cause of post-fit problems.
Step 1 — Mark Installation Positions
Measure and mark hinge positions on the frame and sash. Ensure upper and lower hinges will sit on the same vertical plane when fitted — misalignment causes binding. Verify your hinge manufacturer's recommended offset distances — these differ by product line.
Step 2 — Fit the Frame-Side Track
Position the track (the longer, fixed component) at the marked location. Per ERA's fitting instructions, the end cap should butt into the corner of the window frame. Drill pilot holes to the correct depth, then fasten the track.
Important: Mila's fitting instructions specify fastening through the oval holes first, so the window can be adjusted later if alignment needs correction. Use round holes for final fixing only after confirming alignment.
Torque requirements vary by frame material:
- Timber and aluminum: Tighten screws firmly to rated torque
- uPVC: Avoid over-torquing — the material strips easily
- All materials: Re-check screw seating after the first full open/close cycle
Step 3 — Fit the Sash-Side Arm
Position the arm (the shorter, movable component) on the sash at the corresponding marked location. Fasten through the oval holes first, leaving room for adjustment — these slots allow minor repositioning before final tightening. Drill pilot holes to match the depth used on the frame side.
Step 4 — Engage Sash with Frame
With the sash held in the closed position, engage the movable arm with the frame-side track. Open the arm only in the direction of the arrow. Slowly open and close the sash to check for smooth, resistance-free operation before tightening any remaining screws.

Step 5 — Final Screw Fixing
Once the sash is confirmed to operate smoothly and sit flush, tighten all screws through the round holes to final torque. Re-check that the gap between sash and frame is consistent on all sides. If the gap is uneven or the sash binds, revisit Step 3 before final tightening.
Post-Fitting Checks and Adjustments
Don't skip this stage. A window that looks correct when closed can still drift, bind, or fail to hold position — and discovering this after installation is more costly than catching it now.
Run through this checklist:
- Use a spirit level to verify the sash sits horizontal (top hung) or plumb (side hung) when closed
- If the sash is out of level, loosen the appropriate hinge screws slightly and use the adjustment slots to correct position before re-tightening
- Open the window to several positions and release — the sash should hold without drifting
If the sash drifts closed, check whether the hinge includes a friction adjustment mechanism. ERA's Horizon hinge, for example, allows friction adjustment via a set screw.
ERA's adjustment instructions are precise on this point: turn the friction screw clockwise in 1/4-turn increments, check resistance, and do not exceed three 1/4-turn increments total. Exceeding this breaks the adjustment thread and damages the hinge permanently. Adjust both top and bottom hinges equally.
For stripped screws in uPVC frames: if a screw turns without gripping, stop immediately. A repair screw with a larger diameter (4.8mm rather than the standard 4.3mm) is designed specifically for re-cutting threads in uPVC without requiring frame replacement.
Common Fitting Problems and Fixes
Window Sash Leaves a Gap in One Corner When Closed
Problem: The sash closes but doesn't sit flush — one corner stands proud of the frame.
Likely cause: One of two installation errors typically causes this:
- Hinge arm opened in the wrong direction before fitting, reversing the geometry
- Hinge installed on the incorrect side of the window
Fix: Remove the hinge, carefully return the arm to its pre-opened position, confirm the directional arrow, and re-fit with the arm opened only in the marked direction. Consult the hinge manufacturer's fitting video if the correct direction is unclear.
Window Sash Drops or Drifts Closed
Problem: The window opens freely but won't hold position — it swings shut without being touched.
Likely cause: The hinge's friction torque is insufficient for the sash weight. Most hinge manufacturers publish maximum sash weight ratings for each range — exceeding those limits causes exactly this problem.
Fix: If the hinge has an adjustable friction pivot, increase torque incrementally within the manufacturer's stated limits. If the hinge is non-adjustable and clearly undersized, replace it with a hinge rated for the actual sash weight.
Scraping, Stiffness, or Binding During Operation
Problem: The sash produces a scraping sound or requires excessive force to open.
Likely cause: Two common culprits:
- Hinges not aligned on the same plane
- Construction debris (dust, cement, sealant) trapped in the hinge groove
Fix: Check that both hinges are co-planar by measuring their positions off a reference edge. Clean the groove thoroughly, then apply a light, appropriate lubricant — a light non-acidic mineral oil (such as 3-in-1) works well, applied twice per year as routine maintenance.
Pro Tips for Fitting Friction Hinges Effectively
Always check the directional arrow before opening the arm. Even partial movement the wrong way stresses the internal friction element — and no amount of re-fitting corrects it.
Confirm handing requirements before ordering or fitting. Some friction hinges require a left/right selection; others are symmetrical. Follow the manufacturer's instructions rather than assuming.
Keep the groove clear of dust, sealant, and debris. A light lubricant applied periodically prevents the gradual stiffness that signals hinge failure is approaching.
Record a written spec per window profile on high-volume assembly lines — track width, track length, stack height, load rating, and handing. Specification drift between orders is a persistent source of rework, and a per-profile document catches substitution errors before they reach the floor.
Conclusion
The quality of a friction hinge installation is largely determined before the drill starts. Selecting the right hinge type, matching the stack height, confirming load rating, and verifying orientation — these decisions eliminate the majority of fitting errors that only surface after the window is in operation.
To recap, the pre-installation decisions that matter most:
- Hinge type matched to the window application and frame material
- Stack height confirmed against the rebate depth
- Load rating verified against the sash weight
- Orientation set correctly before fastening
Once the hinge is fitted, validation is not optional. A sash that closes flush, holds at any open angle, and shows no binding or drift is the only reliable confirmation the installation was done right. Run those checks before the job is signed off — not after the first callback.
Frequently Asked Questions
What is the difference between a side hung and a top hung friction hinge?
Side hung windows open left or right, with hinges fitted to the top and bottom sash edges. Top hung windows open outward from the top, with hinges fitted to the left and right sides. The two types are not interchangeable. Confirm the window type before selecting or ordering hinges.
How do I know what size friction hinge I need?
Check three measurements and match all to the existing hinge or window profile specification:
- Stack height: 13mm for a flat arm, 17mm for a kinked arm
- Track length: full length of the frame-side track, including the end cap
- Track width: measured at the outermost edge of the track
Do friction hinges need to be replaced in pairs?
Yes. Replacing hinges as a matched pair ensures consistent load distribution and friction torque across both hinge points. Mixing old and new hinges of different conditions or specifications causes uneven wear and can pull the sash out of alignment over time.
What causes a friction hinge to lose its holding force over time?
The internal friction element wears with repeated use. Common causes include:
- Forcing the hinge open in the wrong direction
- Using a hinge undersized for the sash weight
- Debris in the groove adding stress to the mechanism with each cycle
Can friction hinges be fitted to aluminum and timber windows as well as uPVC?
Yes. Friction hinges are used across uPVC, aluminum, and timber frames, but the screw type, pilot hole approach, and fixing method must match the frame material. Aluminum windows sometimes use rivets rather than screws ; identify the existing fixing method and replicate it when replacing.
How do I adjust the friction torque after fitting?
On hinges with an adjustable friction pivot, turn the set screw clockwise in 1/4-turn increments, testing resistance after each. Do not exceed three increments — doing so can strip the adjustment thread and damage the hinge. If the hinge is non-adjustable and the sash still drifts, the load rating is mismatched; replace it with one rated for the correct sash weight.