Introduction
Submitting an RFQ to a custom hinge manufacturer triggers a multi-stage engineering collaboration, not a simple order-and-ship transaction. Product engineers, procurement leads, and OEM designers in appliances, transportation, medical devices, and industrial equipment all bring different inputs to that process—and the manufacturer needs active participation from your side to deliver a component that meets precise performance requirements.
Most buyers working with a custom hinge manufacturer for the first time struggle with the same gaps: what information to prepare, which decisions happen at each stage, and how long the process realistically takes. Those gaps cause delays and components that miss critical specifications.
This guide walks through the full development sequence—from initial engineering review through design iteration to validated prototype—so you can set realistic timelines and come to each stage prepared.
Key Takeaways
- Custom hinge development follows a structured sequence: RFQ, engineering review, design collaboration, prototyping, and performance validation
- Incomplete application specs are the most common cause of early delays; what you bring to the RFQ directly affects timeline
- Most programs require 1–3 design iterations before production approval; iteration is normal, not a failure signal
- Timeline varies based on complexity and tooling requirements, but understanding key drivers helps set accurate expectations
- Modified standard solutions can sometimes deliver 80% of the benefit of a fully custom hinge at lower cost and faster turnaround
What the RFQ-to-Prototype Process Actually Involves
The journey from RFQ to validated prototype is an iterative engineering partnership, not a request-and-receive cycle. Both the buyer and manufacturer work through multiple defined phases, and rushing or skipping any stage creates problems downstream.
Four Core Phases
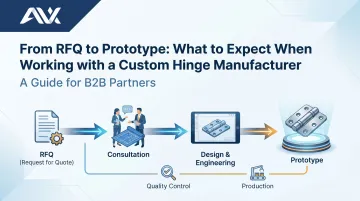
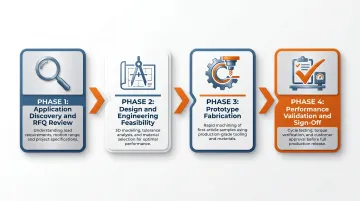
Most custom hinge programs move through:
- Application discovery and RFQ review — The manufacturer assesses feasibility and clarifies requirements
- Design and engineering feasibility — Concepts are developed and trade-offs are resolved
- Prototype fabrication — Pre-production samples are manufactured to finalized specs
- Performance validation and sign-off — Testing confirms the design meets all requirements
What Makes Custom Different
Unlike ordering a catalog component, custom hinge programs require:
- Tolerances sized to your exact mounting and dimensional constraints, not pulled from a standard spec sheet
- Materials and finishes chosen for your specific operating environment — temperature range, moisture exposure, chemical contact, and cycle frequency all factor in
- Motion control parameters — torque profile, range of motion, counterbalance force — engineered to your application from the ground up
Why This Matters in Demanding Sectors
In home appliances, commercial kitchen equipment, and transportation, hinge failure affects end-user safety, warranty exposure, and brand reputation. CPSC recall data shows that hinge and closure mechanism failures triggered recalls affecting over 1.4 million appliance units between 2024-2026, including a single recall of approximately 1.29 million Oster countertop ovens due to spring-loaded door mechanisms rebounding unexpectedly.
Manufacturers with deep custom hinge experience approach each program as a collaborative engineering engagement. Mansfield Engineered Components, for instance, designs and ships over 250,000 motion control components weekly for brands like GE, Bosch, and Sub-Zero — every one of them fully engineered to a specific application.
What to Prepare Before You Submit an RFQ
The information you provide before or during RFQ submission directly affects how quickly engineering review progresses. Gaps in specifications are the most common reason early-stage reviews stall.
Essential Application Information
Document these details before reaching out:
- Intended use and operating environment — Temperature range, exposure to moisture or chemicals, load frequency
- Motion control requirements — Swing angle, torque or counterbalance force needed, hold-at-angle expectations
- Mounting constraints — How the hinge attaches to your assembly and any dimensional envelope restrictions
- Performance outcomes — What the hinge must do (e.g., hold a 40-lb oven door open at 90°, survive 100,000 cycles)
Ideal vs. Sufficient Documentation
Ideal to have:
- Detailed CAD drawings (STEP format preferred)
- Existing hinge samples or reference images
- Load/cycle data from testing or field performance
Sufficient to get started:
- Written description of function and operating conditions
- Sketch or reference image showing intended motion
- Key dimensions and weight/load estimates
A responsive manufacturer will help fill gaps during engineering review. Lasso Supply Chain's RFQ guidance notes that involving technical experts early — before specifications are locked — compresses review cycles and reduces revision loops.
Information That Most Commonly Causes Delays
These missing inputs trigger back-and-forth clarifications:
- No weight or load data — Engineers can't size springs or calculate torque without it
- Unspecified environmental conditions — Material and finish selections depend on operating environment
- Conflicting dimensional constraints — Mounting space must accommodate the mechanism's physical geometry
- Undisclosed volume or target cost — Tooling decisions and design approach vary significantly by production scale
Those gaps have real consequences downstream: 31% of B2B buyers report inconsistent delivery information from suppliers, a problem frequently traced back to incomplete specifications at the inquiry stage.
How the Custom Hinge Development Process Works, Step by Step
The following steps represent the typical sequence from first contact to prototype delivery. Some steps may overlap or iterate depending on design complexity.
Step 1: RFQ Submission and Initial Engineering Review
After you submit an RFQ, the manufacturer's engineering team reviews your application requirements for feasibility. They determine whether an existing standard or modified solution can meet your needs—or whether a fully custom design is warranted.
During this phase, engineers ask clarifying questions about dimensional constraints, performance expectations, and operating conditions. A responsive manufacturer flags feasibility concerns or alternative approaches the same day — not three days later after you've already escalated internally. Mansfield Engineered Components holds same-day response as a standing commitment on all customer inquiries.
Step 2: Design Concept and Collaboration
Engineers develop one or more concept designs, typically shared as CAD models or drawings. This stage requires active feedback from you on fit, form, and function priorities.
Design trade-offs are resolved here before any tooling or fabrication begins:
- Cost vs. material grade (e.g., stainless steel vs. cold-rolled steel)
- Packaging size vs. load capacity
- Tooling investment vs. unit cost at target volume
Your input during this phase directly shapes the final design — delays here cascade through the entire program timeline.
Step 3: Design Finalization and Tooling
Once you approve a design concept, detailed engineering drawings are finalized, materials are specified, and any necessary tooling or fixtures are created.
This stage has the longest lead time variability. Tooling costs and timelines vary significantly based on approach:
- Soft/prototype tooling: ~$3,000; faster lead times, suitable for early-stage validation
- Progressive die (hard) tooling: ~$30,000; total lead times typically run 8–11 weeks from design to first article, but delivers the repeatability required for production volumes
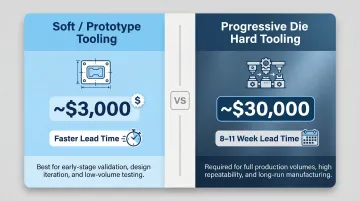
If your design uses existing tooling, this phase moves quickly. New hard tooling is typically the longest single phase in the entire program — plan accordingly.
Step 4: Prototype Fabrication
Manufacturers typically produce a small quantity of pre-production samples using the same materials and processes as production — enough for fit and function checks before committing to full production tooling.
Mansfield Engineered Components handles prototyping entirely in-house. With 80+ years of manufacturing experience and a team of 200+ engineers and manufacturing professionals, prototypes move through fabrication and quality review without the delays that come from external lab handoffs.
Step 5: Testing and Validation
Custom hinge prototypes undergo performance testing to confirm they meet all requirements:
- Cycle/life testing — Validates durability over expected product lifespan; ANSI/BHMA A156.26 requires Grade 1 hinges to pass 2.5 million cycles
- Load and torque verification — Confirms force requirements across the motion arc
- Environmental exposure testing — Heat, humidity, and corrosion resistance for specific applications
- Fit confirmation — Physical installation on the actual product assembly
A "pass" means the prototype meets all specified performance criteria and is approved for production. Any performance gaps identified during testing trigger a design revision loop before production approval.
Key Factors That Affect Development Timeline and Outcome
Design Complexity
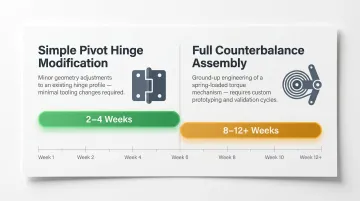
This is the biggest timeline driver. A hinge requiring a novel motion path, integrated counterbalance mechanism, or tight tolerance on non-standard material takes longer than a geometry modification to an existing design.
Example contrast:
- Simple pivot hinge modification — Changing hole pattern or length on an existing design: 2-4 weeks
- Full counterbalance assembly — Engineering a spring-loaded mechanism with specific torque curve and hold-at-angle requirements: 8-12+ weeks
Buyer Responsiveness
Your speed at key decision points directly affects program velocity:
- Approving CAD drawings
- Providing fit feedback on prototypes
- Confirming test acceptance criteria
Delays on the buyer's side are just as impactful as delays on the manufacturer's side. SVI Global research identifies mid-production specification changes and delayed approvals as common buyer-side causes of production delays.
Tooling, Material Sourcing, and Test Cycles
These manufacturer-side variables are separate from your responsiveness — but they're equally worth surfacing early:
- Hard tooling adds 8-11 weeks vs. soft tooling
- Specialty materials or finishes may require longer lead times
- Complex environmental testing cycles extend validation timelines
At the RFQ stage, ask your manufacturer which of these apply to your design — and whether any can run in parallel with design iterations to compress the overall schedule.
Common Misconceptions About the Custom Hinge Development Process
"I Need Complete Engineering Drawings Before I Can Begin"
You don't. A clear functional description and key dimensional constraints are sufficient to start an engineering conversation. An experienced manufacturer will help develop the design.
What you should provide:
- What the hinge must do
- The space it must fit within
- The load it must handle
- The environment it must survive
The manufacturer's engineering team will translate these requirements into a detailed design.
"Custom Always Means Expensive and Slow"
Not always. For applications with high cycle demands, unusual motion requirements, or specific environmental exposure, a properly engineered custom hinge reduces total cost over the product lifecycle by eliminating field failures and redesigns.
Component Hardware Group documents that custom assemblies reduce total cost of ownership through longer lifespan, reduced field failures, and simplified inventory—even when initial unit costs exceed standard catalog components.
In some cases, a modified standard hinge can sometimes deliver 80% of the benefit at significantly lower cost and faster lead time. The right choice depends on how closely standard options meet your functional and environmental requirements.
"Prototypes Should Be Final"
Most programs go through 1–3 iterations before a design is production-approved. Industry benchmarks show 2-3 iterations for simple mechanical products and 4-5+ for complex assemblies.
Iteration is a normal, expected part of the process—not a sign that something went wrong. Buyers who plan for iteration cycles in their product development schedule have smoother experiences and reach production approval faster.
Frequently Asked Questions
How are door hinges made?
Most hinges are manufactured through metal stamping and forming, where steel or other alloy is cut, shaped, and assembled around a pin. For custom hinges, precision machining, tooling, and process controls are added to meet application-specific tolerances and performance requirements.
What information do I need to submit an RFQ for a custom hinge?
Core inputs include:
- Application description and intended use environment
- Load, weight, and range of motion requirements
- Dimensional constraints and mounting configuration
- Target volume and any relevant timeline
Partial information is enough to get started — a manufacturer like Mansfield Engineered Components will work through the gaps with you in the initial engineering conversation.
How long does it take to go from RFQ to prototype?
Timelines vary based on design complexity, tooling requirements, and test scope — generally weeks to a few months. Ask for a project-specific estimate at the RFQ stage, since application requirements drive the schedule more than any general rule of thumb.
What's the difference between a modified standard hinge and a fully custom hinge?
A modified standard hinge adapts an existing design (for example, changing material, finish, hole pattern, or length) while a fully custom hinge is engineered from the ground up for a specific application. The right choice depends on how closely standard options meet your functional and environmental requirements.
How many prototype iterations are typically needed before production?
Most programs require 1–3 iterations. The first prototype validates fit and basic function; subsequent rounds address performance gaps identified during testing. Complex mechanisms or tight tolerances may push that number higher.
What testing is performed on custom hinge prototypes?
Typical tests include: cycle/life testing to validate durability, load and torque verification across the motion arc, environmental testing (heat, humidity, corrosion resistance), and physical fit confirmation on the target assembly.